Episode III: Fundamental Gates
In this chapter, we will introduce quantum logic gates and how to apply them with Qiskit. At the end of this chapter, we will have created a circuit that:
- Applies each of the basic quantum logic gates we have been introduced to on a qubit
- Recreates some of the fundamental quantum logic gates
The Hadamard Gate
Remember in the previous chapter where we mentioned superposition?
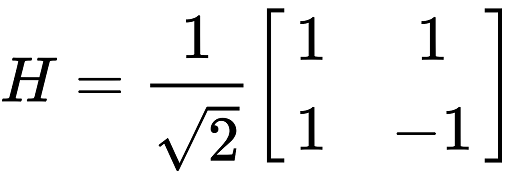
Hadamard gates put qubits into a superposition.
This is represented by a a Hadamard Matrix:
Luckily for us, this is easy to do in Qiskit. Let us demonstrate this through a basic circuit:
qubit0 = QuantumRegister(1, name = "qubit0") # Create a qubit on the quantum register
classic_bit0 = ClassicalRegister(1, name = "classic_bit0") # Create a classic bit on the classical register
circuit = QuantumCircuit(qubit0, classic_bit0) # Create a quantum circuit from our qubit/bit

circuit.h(qubit0) # Applies a Hadamard gate to qubit0
Recall from seminar that applying a Hadamard gate to a qubit means that upon measurement, there is an equal chance to observing a 0 or 1. In other words, the odds are fifty-fifty.

Additionally, the Hadamard gate is the one-qubit instance for the quantum Fourier transform.
With that being said, the .h() method is equivalent to the following code snippet:
state = [math.sqrt(1/2), math.sqrt(1/2)] # This is a vector in the form of a list: [alpha, beta]
circuit.initialize(state, qubit0) # Initializes qubit0 to the defined state
An important thing to note is that the Hadamard gate allows you to transform states of qubits between the X and Z bases.
The X-gate
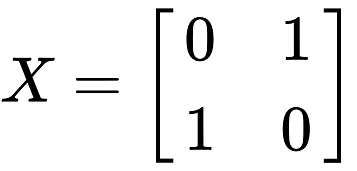
The X-gate is a NOT gate in quantum computing. It’s pretty intuitive and will flip the state of a qubit.
This is represented by a Pauli-X Matrix:
In Qiskit, you can apply the X-gate using the .x() method:
circuit.x(qubit)
Essentially, the X-gate maps the basis state |0⟩ to |1⟩, and vice-versa.
The Y-gate
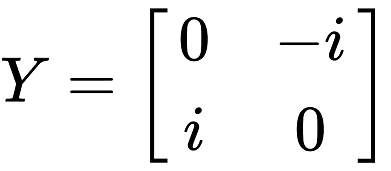
The Y-gate is used for rotation around the Y-axis of the Bloch sphere (by pi radians).
This is represented by a Pauli-Y Matrix:
In Qiskit, it is represented by the .y() method:
circuit.y(qubit)
The Y-gate maps the basis states |0⟩ to i|1⟩, and |1⟩ to -i|0⟩.
The Z-gate
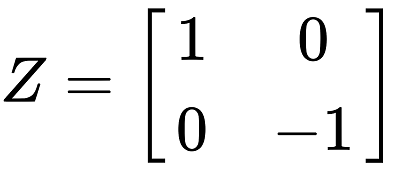
The Z-gate is known as a phase-flip and is used for rotation around the Z-axis of the Bloch sphere (by pi radians).
This is represented by a Pauli-Z Matrix:
In Qiskit, it is represented by the .z() method:
circuit.z(qubit)
The Z-gate does not affect the basis state |0⟩, but maps the basis state |1⟩ to -|1⟩.
Phase Shift Gates
Phase shift gates are important in the creation of advanced quantum algorithms. The R(phi)-gate is used to perform rotations (defined by phi radians) on the Bloch sphere. In fact, the Z-gate is a special case of the R(phi)-gate, where phi = pi. We will continue demonstrate this as we go on.
This is represented by the following matrix:
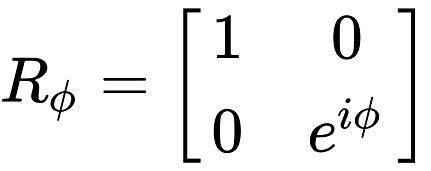
In Qiskit, the R(phi)-gate is represented by the .rz() method:
circuit.rz(phi, qubit) # where phi is in radians
This gate is fundamental for manipulating the spins of qubits around the Bloch sphere in terms of working in different bases.
They map basis states |0⟩ to |0⟩ and |1⟩ to e^(i*phi)|1⟩.
The S-gate
The S-gate is a variation of the R(phi)-gate where phi = pi/2. Essentially, it performs a 90-degree z-axis rotation on the Bloch sphere.
In Qiskit, it is represented by the .s() method:
circuit.s(qubit)
The conjugate transpose of the S-gate is known as the Sdg gate (or S-dagger). You can use it in Qiskit with the .sdg() method:
circuit.sdg(qubit)
It might not be obvious at first, but you can actually recreate the Sdg gate with the relation: Sdg = ZS.
Bringing it all together
By applying various combinations of the gates in this chapter, you can actually recreate some of them. For example, the X-gate is simple to implement using just Hadamard and Z-gates. In fact, it is just the relation: X = HZH.
Let’s try it:
def simulate(circuit): # this is a helper function for simulating and spitting out counts
    backend = Aer.get_backend('qasm_simulator')
    job = execute(circuit, backend, shots=1000) # Simulate our circuit 1000 times
    result = job.result()
    data = result.get_counts() # Retrieve data
    print("Counts: ", data) # Present data

qubit0 = QuantumRegister(1, name = "qubit0") # Create a qubit on the quantum register
classic_bit0 = ClassicalRegister(1, name = "classic_bit0") # Create a classic bit on the classical register
circuit = QuantumCircuit(qubit0, classic_bit0) # Create a quantum circuit from our qubit/bit

state = [0, 1] # This is a vector in the form of a list: [alpha, beta]
circuit.initialize(state, qubit0) # Initializes qubit0 to state |1⟩

# Refer to the relation defined above and write your code below using only Hadamard and Z-gates.


circuit.measure(qubit0, classic_bit0) # Perform Z-measurement
simulate(circuit)
We initialized our qubit to be in the |1⟩ state and since the X-gate acts like a NOT gate, you should find that your qubit will measure in the |0⟩ state every time.
Okay, that might have been too simple.
Let’s try and create the Y-gate using just the R(phi) and H-gates. A simple way to recreate the Y-gate is through the relation: Y = SX(Sdg). Can you implement this without explicitly using the Sdg method?
def simulate(circuit): # this is a helper function for simulating and spitting out counts
    backend = Aer.get_backend('qasm_simulator')
    job = execute(circuit, backend, shots=1000) # Simulate our circuit 1000 times
    result = job.result()
    data = result.get_counts() # Retrieve data
    print("Counts: ", data) # Present data

qubit0 = QuantumRegister(1, name = "qubit0") # Create a qubit on the quantum register
classic_bit0 = ClassicalRegister(1, name = "classic_bit0") # Create a classic bit on the classical register
circuit = QuantumCircuit(qubit0, classic_bit0) # Create a quantum circuit from our qubit/bit

state = [0, 1] # This is a vector in the form of a list: [alpha, beta]
circuit.initialize(state, qubit0) # Initializes qubit0 to state |1⟩

# Refer to the relation defined above and write your code below using only R(phi) and H-gates.


circuit.measure(qubit0, classic_bit0) # Perform Z-measurement
simulate(circuit)
Were you able to do it? Remember that solution code will be provided in the examples folder.
Conclusion
At this point, we have recreated the X and Y-gates in Qiskit. In the next episode, these gates will prove useful as we go over the use of multiple qubits and entanglement.
Let us head on to Episode IV!
Return to the Homepage!